Saturday, December 26, 2015

Felt Ornaments Tutorial

'Tis the season for gift-giving and I am STILL trying VERY hard to gift as much handmade and up-cycled loving gifts as possible. It has been hard with my past semester's workload, but I had my mind set to do something for each one of my friends. So, I scoured the web to look for things that I could make as soon as I got on Christmas break.

I have always loved felt ornaments, and I knew they would be something I could accomplish easily, so I set out to buy some supplies from Hobby Lobby.


I got everything for 50% off, and also got some supplies that I did not use for this project (bells & sequins) but sometimes when I start a project my mind goes in one direction...when I truly end up taking a completely different path. This project was a bit side tracked, just like that. LOL. 


This is stuff that I truly used: some home-made cardboard shapes, felt, embroidery thread...


...and the ribbon spool from this image. ^__^  You may yet get to see the rest of the supplies, used later on for other projects. Who knows? With me it's always a surprise. HA!


This is how I made my heart pattern. I used an old cracker cardboard box and took advantage of the pleat. I drew my half hart on one side and cut it out, when I got the shape I liked. Drum roll...


...Tah-Daaaaahhhh symmetrical heart (with messy doodling all over it) created.


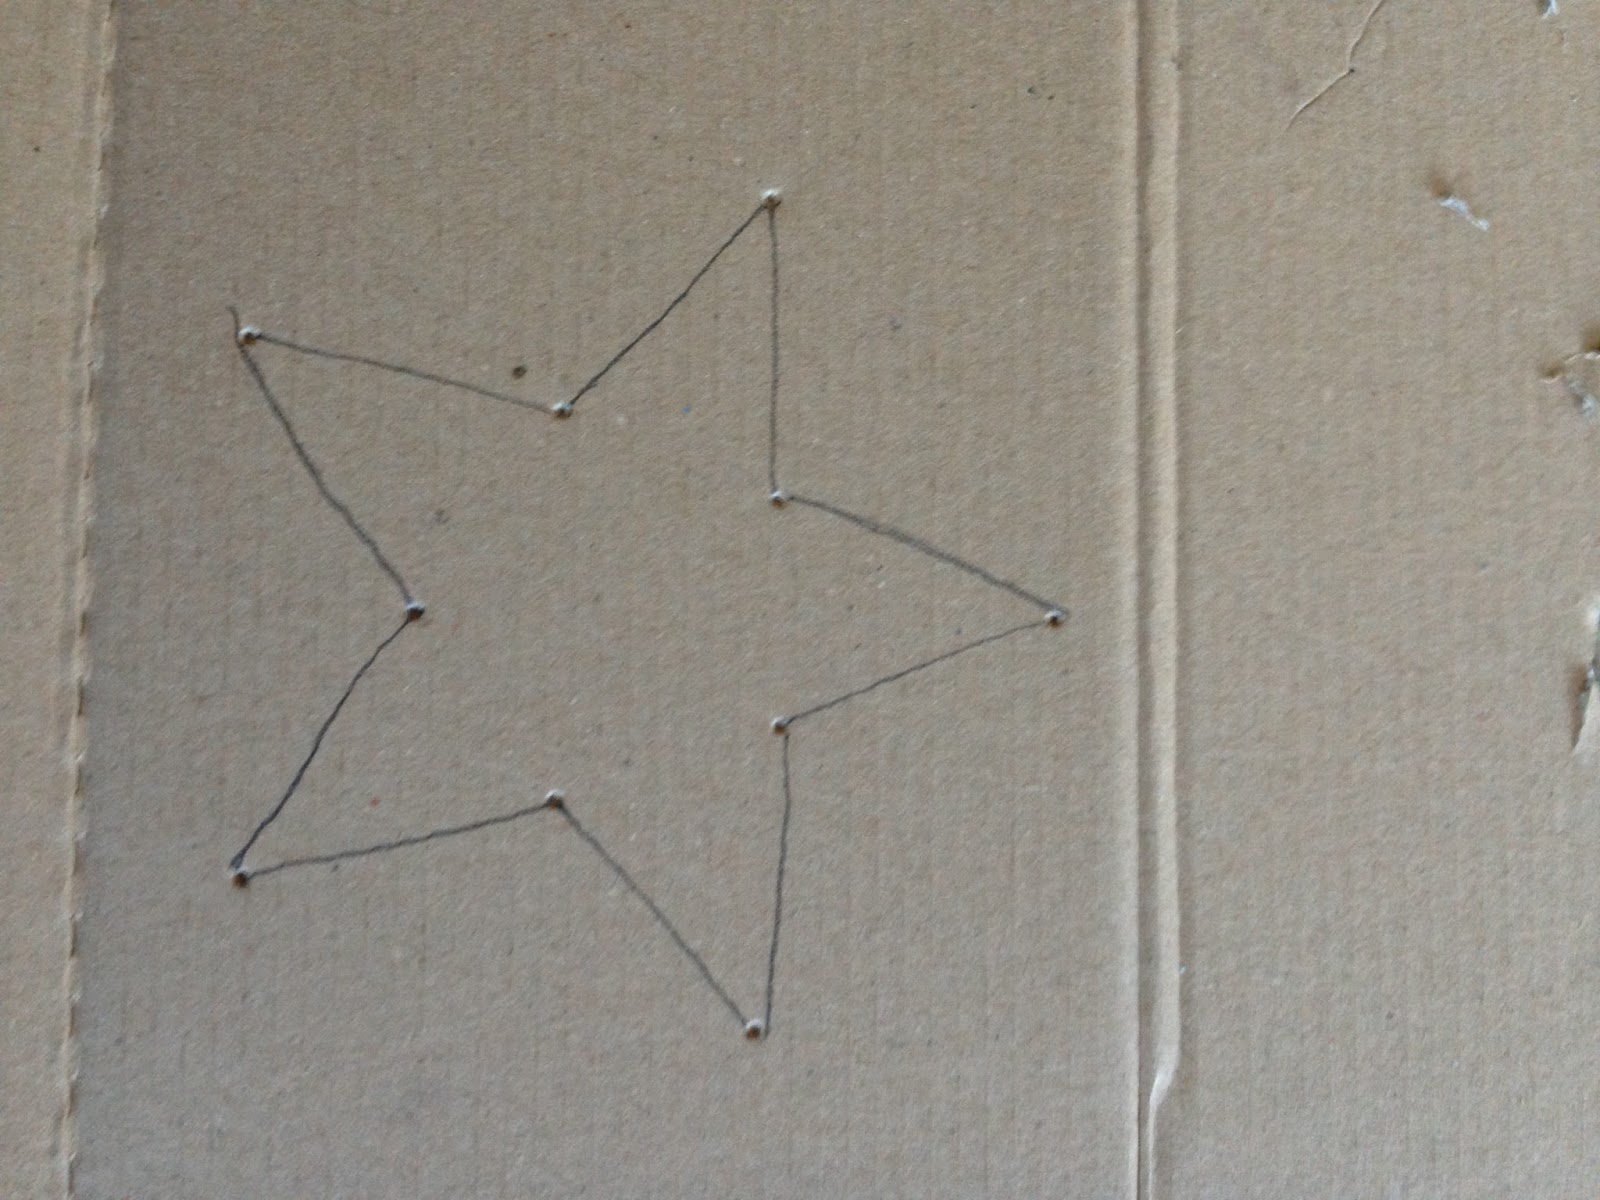
I repeated the process for the star poking holes at the correct distances then connecting the dots.


I then used the pattern to trace the shapes on the WRONG SIDE of the felt...


...and I cut them out. 


At this point I just free handed some very SIMPLE embroidery on half of my cutouts. YES, OFF COURSE THAT IS A CAT UNDER THE ORNAMENT. ^__^ How could it not be? The fur babies are always trying to help me with my projects and they make sure they put their stamp (a.k.a. hair) on all of my projects. But that's how we roll here...


I cut a piece of ribbon to the desired length and secured it in place with a few stitches. I wanted to make sure it would stay folded the way I liked it, with the print facing the ornament.


I then got a second felt heart, I matched wrong side with wrong side (right sides out) and I hand stitched the perimeters shut. I placed my ribbon sandwiched between the 2 layers of felt and stitched it in place making sure I got as many stitches possible through the ribbon.


I continued stitching all around the perimeter, leaving a small opening for stuffing.


...I used a mixture of simple stitching and blanket stitching for my perimeter (both are easy patterns to learn and tons of videos are available on youtube)...and YES, this is a different cat. LOL. They did take turns hogging my lap while I was sewing. They do get mesmerized by the thread and then fall into an hypnotic coma. O__o


I then stuffed the ornaments (and pushed the stuffing to the corners with fingers and a wooden skewer) and closed up the perimeter. That's about it. 


This is how they look in a grouping. 
I think they came out pretty good.
I gave one each to my Christmas guests as a small homemade token, hopefully they liked them.

Happy Holidays :)


Friday, December 18, 2015

Vegan Pumpkin-Coconut Bread Tutorial

So here I am...back after a long silence!
My semester has been so busy that I have not had time to post. However, I have crafted some stuff, so I will slowly try to update my blog with my summer/fall projects and with my current ones as well.

The holidays are here, and I found a great recipe for a healthy spiced bread that I wanted to share.

I found the original recipe at cakemerchant.com and I modified it slightly to our taste. I like that it is a "one bowl batter" so it's super quick to measure, mix and bake. Low maintenance food is my favorite!

(Makes one LARGE plumcake loaf, or a regular loaf + 6 muffins)

INGREDIENTS:

1.5 cups flour
1.5 cups dark brown sugar
1 tsp baking soda
1/2 tsp salt
1/2 tsp nutmeg
1 tsp cinnamon
1 cup pumpkin puree
3/4 cup cooled melted coconut oil
1/3 cup coconut milk
1/3 cup unsweetened shredded coconut
Garnish: 1 tbsp cinnamon sugar and coconut flakes (or shredded)


I added all my dry ingredients to the bowl: flour, baking soda, salt, sugar (I ran out of brown sugar so I added some regular organic sugar from Costco, right side of the bowl) and the spices...


...and mixed well.


Then I added my wet ingredients: pumpkin, coconut milk and melted oil...


...and mixed well.


My coconut milk was mostly solid, so I added some water until I got a batter with the right consistency. This batter is on the heavy side! I then added the shredded coconut and mixed well.


At this point I poured the batter into my loaf silicone mold. I love these molds as nothing sticks to them and it's super easy to peel the cakes from them retaining perfect shapes! Also, no buttering/greasing needed with those pans. Thumbs up to that!


I then sprinkled some coconut flakes to the top (shredded coconut can be used as well)...


...and I sprinkled some cinnamon sugar too.


I baked at 350 for 1 hour and 10 minutes (it will bake quicker at sea level) and that was it!


This is a great coffee cake for the holidays; it works well in a muffin form too. The muffins do cook quicker, since they are so much smaller. To make sure I was not burning them, I checked them often (around the hour mark) by inserting a wooden skewer into the center. When the skewer comes out clean, they are ready. 


Enjoy your holiday season! 


Thursday, July 2, 2015

How to Save "Dried-up Wood Filler"

It is summer time, and am nearly done with summer classes, so time has come to get back on the horse and work on some more projects! But as I go grab my beloved wood filler, I realize that Colorado dry weather has killed it! What has a girl to do, when she needs wood filler ASAP, and has a brick-in-a-box, you ask? Well, if it was old I would probably toss it. But I bought this 6 months ago...so I got dead bent into rescuing it instead! I figured that I had nothing to loose and tried my very best at resurrection! ^__^


Exibit A: caked, dried up wood filler -__-


I proceded to hack at the brick-o-solid with a butter knife 


I then used the back of a spoon to pulverize the clumps as much as possible...


...until I ended up with a smoothish powder


I added BOILING hot water (2 tablespoons to start with)...


...and mixed, mixed, mixed!


At this point it was better but still not the right consistency. I scraped the corners and the edges and gathered ALL the dry material. Now you see it...


...now you don't ^__^


I added one more TBSP (3 total by now) of boiling water and mixed some more. This is the result:


Perfect consistency wood filler. Just like new! 
I hope this is helpful in case this happens to you. Sometimes the solution is easier than you think!

Happy Summer!

Sunday, May 31, 2015

How To Store Feta Cheese

I buy most of my groceries at Costco but, being a family of only 2, sometimes the amounts are simply too much for us to use at once. So I have learned to store most items to avoid spoilage and waste. 

I freeze anything I can: sliced bread, tortillas, cheeses (sliced, shredded or whole), butter, raw meats, sauces (pesto, indian cooking sauces, etc), fresh pasta (tortellini, mezzelune, panzerotti, etc), cold cuts and so forth. I also freeze eggs (unshelled, they can be frozen in ice trays, then stored in ziplock bags and used for any cooked applications when thawed). I always thaw in the fridge overnight and consume the items as I would if they were fresh. So far, I have had no problems with this method. Some items like Feta however, need further action to preserve them even longer, once thawed. 

Feta cheese can be preserved in 3 different ways: with milk, if you desire to reduce the salt content (just cover the feta with whole milk and store in an air tight container in the fridge), with extra virgin olive oil, if you desire to have a more pungent, strong cheese (just cover the feta with EVOO and store in air tight container in the fridge) or with brine. Brine is the most common commercial storing method, and it is also what I prefer. Brine is easily made, once one figure out the proper ratio between salt and water. The common recipe is: 1 gallon of water to 1 lb of salt, but I found it impractical for household use. I don't need a gallon of brine, so I scale down the recipe for 1 brick of Feta cheese.

Here is what I do:


Mis En Place:

1 Brick of Feta Cheese
1 Air tight container (I opted to save a commercial Feta container --next to the salt, top left--, as it is the perfect size, easily recognizable at a glance in the fridge, but most importantly it is spill-proof!)
1 Cup Water
1 oz Sea Salt
1 Digital Scale

Directions:


I slice the Feta to fit into the container (the size of this plastic-wrapped-brick is slightly different than what usually comes in this particular container). The cheese needs to be covered by brine to be preserved, so it is important that it lays flat in the container.


 I measure one cup of cold water...


...I then zero-out the scale by placing my container on it and pressing the tare button.


Measure one ounce of sea salt 
(my scale measures both pounds and ounces, so the display reads 0 lb 1.0 oz)


I combine the salt and water...


...and mix well, until completely dissolved.


At this point I pour the brine over the cheese...


...et voila'. Nothing left to do but store it in the fridge. I find that in brine Feta lasts for months at the time. I have yet to have this cheese go bad or mold. It is such a versatile cheese and can be used in salads, quiches, frittate, and much, much more...

Enjoy!

Sunday, March 29, 2015

#2 Felted Sweater Tote Tutorial

Here I am again. It's been longer than I had wanted to. But life is busy with work, school and projects around the house. In my last post, I mentioned that I wanted to write a second tutorial for a 2nd thrifted sweater. I hope that this will give yet another idea on how many different styles this project can be adapted to. All you need is an old sweater and your creativity. So here we go again...

I started with a natural fiber sweater. 
Smokey Bones is ensuring that both quality, and softness, is adequate for our good friend C...


I purchased this sweater from ARC Thrift Shop on 'half-off' day, the tag reads 60% Alpaca, 40% lambswool. A bargain for sure!


The sweater has GREAT colors and an AWESOME pattern, but it sat on the rack for quite a while due to one obvious problem; behold the 'holey sweater'...there were a total of 6 in the top! :-(


I repeated the washing process from my previous felted tote and I washed it and dried it twice. Smokey Bones approved of the felting quality...


Here I used chalk to outline my main shape and cut away the sleeves and neckline...you can see how the felting has made the fibers matt tightly. We like it! ^__^ 


 Shape cut. Can you spot the holes? Hint: 3 are visible here.
Yep. Those moths had a party and this sweater was the main course! ^__^


I used one of the sleeves to cut my tote's bottom...


...I turned the sweater inside out, and pinned the bottom in place (right side to right side).


When I sewed the bottom, I made sure to exclude the holes that where on the waistline. I then turned it right side out...as you can see one of the holes on the waistline was too high, so I could not exclude him. I hand stitched IT closed...one by one, they all had to go. Who wants a tote with holes? :-)


Now, the fun part. Embellishments. I used tape -and a pill bottle- to draw and cut circular shapes (out of scraps from my previous tote project - nothing gets tossed and all gets recycled around here).


I then cut some V shapes (randomly around the felt circle) and I rounded up the corners to resemble petals. I cut 4 of those disks in different sizes, and I cut a few shapes to resemble stylized leaves too.


I laid them on the tote bag, to decide placement...


...I then got two recycled buttons and I used them to secure the center of the stacked flowers. I also secured the bottom flower to the tote with a few stitches. The top flower is left 'floating'.


I then secured the leaves stitching around their perimeter...


To give an extra pop of color (as well as draw a more organic shape) I used a contrasting thread color to stitch the 'spine' of the leaves.


It turned out pretty cute I think.


Here is the handbag finished.


And here it is in all its FILLED glory :-) 


I hope that C. will like it and find good uses for it. I truly do love the colors and pattern of this sweater, so I feel pretty good about having given it a new life.

Reduce
Reuse
Recycle