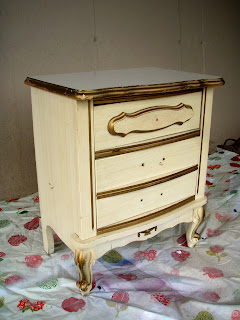
As always, I started with removing the hardware, sanding lightly the piece and wiping it down. This time, I wiped it with some water/TSP solution (this bad boy was D-I-R-T-Y) since it really needed the extra care.
While I was waiting for the piece to dry, I installed the hardware on the back of a cardboard box. This always makes it easier to paint, as I can move the box and spray it from all angles.
I sprayed the hardware two thin coats of Rustoleum spray paint "rubbed bronze".
The top is made of formica, so to ensure a good adhesion, I was careful when sanding to rough it up completely. I then followed with my favorite bonding primer (Zinsser). Trying to minimize, as much as possible, the amount of brushstrokes on the curvy details, I chose the spray for this project. I lightly sanded, in between coats as well, where/when needed.
I then used my Purdy brush and applied 2 even coats of Valspar Latex Satin "Cincinnatian Hotel" all over the piece and the drawer fronts. I masked the area, inside the nightstand, that I didn't want to be smudged by paint.
I waited a full 24 hours, for the paint to cure, before I measured my stripes; I then masked accordingly making sure anything that I did not want to be painted was fully covered.
Then I carefully painted my striping (two coats) and turned the piece to best suit my needs. For the stripes, and drawer front plaque detail, I used Valspar Latex Satin "Wool Coat".
Before the second layer of paint was dry I VERY CAREFULLY removed all the tape. As always, nothing is ever perfect, so the next day I went back in, with a small precision brush, for touchups.
24 hours later the entire piece got two coats of Polycrylic from Minwax for a durable satin finish.
I waited a full 72 hours to work on it again. I wanted to make sure that all the layers of paint would FULLY cure. I then proceeded to line the two small drawers with some leftover contact paper.
I never stress out too much if things are not perfect. In the end, once it's all said and done, the mistakes (like this paper not perfectly sized) will be barely noticeable. More on lining drawers in this post.
At this point I reinstalled the hardware. And I took this cute little guy to it's final location in my guest room. I think he looks pretty dashing in his striped new suit ^__^
Here is a view of the lined bottom drawer. I love the juxtaposition of stripes and polka dots.
...and then again a close up of the top drawer. Here you can see the original 'Bonnet' tag on the left.
I hope this inspires you to give a makeover to one of your pieces. A nightstand is the perfect place to start for a newbie, as small projects tend to be less overwhelming. Happy up-cycling!


No comments:
Post a Comment