Wednesday, June 22, 2016

DYI Cat Cave Tutorial

Sometimes people think that a lot of money, and time, needs to be spent in order to enrich their cats environment. Well, that is not the case at all! There are so many hacks out there in the world-wide-web that can be easy, and cheap, do-it-yourself projects. This is a project that I first saw on Cole & Marmalade Youtube channel. If you have never watched their antics, you can find them at:

https://www.youtube.com/user/chrispoole20t


This super easy tutorial shows how to make a cat-cave, with items that are  not only very inexpensive but also forgotten around our homes. This project is very simple, only a few items are needed to complete it:

  • 1 cardboard box
  • 1 old T-shirt (must be of the same size as the box of your choosing)
  • 1 old towel (or blanket)
  • Some duct tape
  • 1 safety pin


I begun by securing the flaps of the box with duct tape (to make a deeper base for the cave). This step may not be necessary if your box fits your t-shirt without pulling the flaps out. You can maybe fold the flaps inward (for additional support) or alternatively cut the flaps off all together.


Then I added a towel to the bottom of the box. I folded it to fit to size. You could technically do this post-assembly. But I find that it is easiest to do it at this stage, despite having to re-adjust it by the end.


Then I slid the box into the T-shirt, with the neck opening lined with the box opening...


I pulled the shirt all the way through and adjusted it to center the neck opening to the box opening.


I then stood the box on it's opening, and started working on folding the hem of the shirt as if it were a gift package that I was wrapping. I believe this is called box pleat, maybe?

Bottom up...
Top folded down...
Smokey Bones supervising my efforts...

Side nicely folded in a triangular shape...
Fold triangle over to meet the hem of the shirt.
At this point I just tried to make it as neat as possible. Holding it in place, I tacked it down with the safety pin making sure to gather fabric from all layers to secure in place.


I then placed the cave on it's side and started to work on tucking in the sleeves. This was hard to do while documenting it at the same time. What you don't see is that, to make the sleeve all nice and taught, I used both hands and tugged (in opposite directions) flattening the fabric very neatly.


This is the final result, with the sleeves neatly tucked in, there is no need for safety pins on the sides.


This is the print on my tee BTW, just in case you were wondering what it was. And, yes! I love this Estes Park tee. When I found it at ARC I knew it would come handy one day. I think it's hilarious!


This is what happened the VERY minute I put the cat-cave down on the floor. Yup, it clearly has the cats 'seal of approval'. Smokey Bones loves it and uses it very often!


I hope this inspires you to make your very own cat-cave and other DYI's for your kitty cats. 
Happy crafting = ^ .. ^ =


Thursday, June 16, 2016

Customizing Kitchen Cabinets (Take Two)

When we moved into our home, 3 summers ago, I set off to repaint my entire kitchen (inside and out). We had inherited a very grimy and dark kitchen, and I knew right away that I wanted to transform it into a bright and cheery room. It took a lot of hard work, and sweat equity, but 2 weeks later our kitchen went from dingy to bright. 

Before
After
When it came to the curio cabinets, I wanted something more fun than just plain paint, so I decide to add contact paper to the back of the cabinet. I found the cutest polka dot patterned paper that matched my Polish Pottery, so I was in heaven!

Curio Wall
This is the story of how sometimes projects don't quite go as expected! 

Fast forward to 3 years later and I got to restart this project from square one. When I originally set our to painting the entire kitchen, we were also tackling many other projects. We were both burned out by then, so to skip on time and labor I figured I'd skip the areas that will get papered. Well, it was not a good decision! Despite the wood being super smooth, I guess it was still textured enough to hinder the paper from fully adhering. So about 2 years post-application, the paper started peeling off the backs. *INSERT VERY SAD FACE HERE*.

In order to staunch the fall, 2 years ago I applied some super glue to the edges. It did an ok job at fighting gravity, but it did not help with the overall curling and peeling. Well, not much could be done, I had to come to grip with reality. The paper had to come down, paint had to go up and new paper had to follow suit. So I got to work and started the disassembly project.  I scraped any paper remnant with a glass scraper, to ensure a clean and smooth surface.

The saddest part was not me having to rework an older project, it was having to say goodbye to this super adorable polka dot paper that I had fallen in love with. It matched my Polish Pottery to a T! Oh well, live and learn they say.  This is what the cabinets looked like after I stripped the paper off. 

Left cabinet with peeling paper, right cabinet prepped for paint.
As you can tell, I had not been careful when I first painted, since I knew that the mess would end up covered. I never gave much thought at how much smoother a surface paint would provide...

I did not worry about priming the cabinet this time (I did when I painted them originally) since my goal was only to provide a smooth surface for the paper to adhere properly. So I just painted 2 coats (cured 24hrs in between coats) of oil based enamel. I used Sherwin Williams semi-gloss in 'White Duck'.


I could have just left it at that and just be happy with the paint, but my kitchen is old and has had some rough times. The paper also covers some of the blemishes that the paint alone cannot.

Before I papered, I made sure to let the paint cure for a full 48 hours. Then I cut the paper to size and gave it a test-run to ensure proper fit BEFORE beginning to adhere it. 

Testing the fit
I then slowly peeled off the back of the paper and worked my way smoothing down any air bubbles 


Since the 3 cabinets are all the same size, I used the peeled off paper backs as templates to help me cut the rest of the pieces.

I always keep the paper a bit larger than the area I am applying it to, and I then trim off the excess with an exacto knife. Ok, this is truly a surgical scalpel...but that's what happens when your DH is a medic. ^__^

Someone needs a manicure...and lotion!
 And that's pretty much it, repeated for the 3 cabinets that hold all my pretty dishes in my kitchen. In case you are interested in this paper, it is Con-tact Brand and the pattern is called 'Lagoon Mist', I purchased it on Amazon and it was about $8 per roll. I used two rolls for this project. And here is the finished product. I don't like this paper as much as my polka dotted one, as it is a much more subtle sea foam green, but I do like that it sits smoothly on my cabinets. 


Off to my next project! * __ * 

Friday, January 29, 2016

Jewelry Trays Tutorial

This project has been a LONG one to say the least. I have been working on these trays for over a year now. It has not been a year long of 'true work'...more like on and off work (due to my schedule but also to the weather). So I am glad to have finally finished them and that they finally reached their destination. My friend C. called me today to say they had arrived in the mail and she seemed super excited about them! Yeay!


As it often is...this project begun at my local thrift store. You have probably seen tons of Monkeypod items in your local store, but may have never given them a second glance. I did too for some time, until I saw another blogger (jenniferrizzo.com) giving them a second chance at life. I thought they were pretty so, I gave it a go myself. When I shopped for this project I looked mainly at shapes and sizes. I wanted to have a cohesive group, but with different silhouettes.  


One of the bowls was marked on the underside. That's how I found out about Monkeypod! 


Without further ado I went to work on sanding these puppies inside and out. 


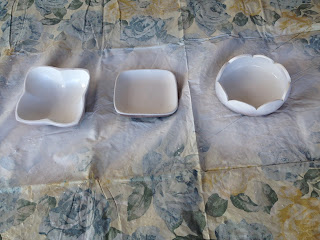
Here are the bowls all nice and scratched...


...and here they are after a good wipe down with a damp cotton rag. 


As with all of my spray paint projects, I primed the items twice...


...and then sprayed them with 2 thin coats of white paint. 

Ok, well...this is where the leaves fell from the trees, snow started falling. Then the snow melted and the the cacti bloomed, then we had a few wild fires in the county and FINALLY I got back on track and regained momentum with this project! 


I used some old plastic bags, and painters tape, to mask the areas that I wanted to remain white.


I then sprayed the silver on the exposed areas (Krilon as well, just in silver).


As soon as the silver paint dried (24hrs) I added more bags at a different angle over the original ones and I sprayed with the chosen colors. Really the most difficult part was to make sure I adhered the tape fully and tightly around the bowls, to avoid leaks and smudges. I did pretty good as most edges were very clean and crisp when I removed the tape. 


These are the 3 paints I used for the color blocking. Bauhaus Gold, Gumdrop and Jade, all gloss. As far as the white paint goes, I used the leftover I had from this previous project. No waste ^__^


I was pretty happy at how they turned out. I like the color blocking very much.


I took a few shots of them with some jewelry, just for fun.
Also, I made sure to let C. know that these are not safe for food. Spray paint is not something you want to be in contact with anything edible! 

What do you think?
Will you ever look at Monkeypod in the same way?
...I didn't think so! :-)