Wednesday, July 31, 2013

Homemade Laundry Detergent Tutorial


After seeing millions of bloggers and Pinterest posts, about homemade laundry detergent, I have decided to give it a go. There were hundreds of recipes out there, all pretty similar, so I went with what was going to meet my needs best. I decided to use this recipe because it's in cups. Which means that one can make a small batch, or a huge batch, very easily. I like that because, in case the recipe is not a success, there will be no waist. I will be sharing half of this detergent with my friend S. so I made a fairly small batch. In this way we'll both have about half a gallon to experiment with. I feel this is just enough to give it a good trial, but not too much to be stuck with it in case we don't like it ^__^


Here is the recipe (adapted from craftingagreenworld.com)

1/2 cup washing soda
1/2 cup borax
1/2 cup baking soda
1/2 cup oxyclean free
1 cup grated bar soap (fels naphta, zote and right guard - in my case)

Here are all my ingredients ready to go (I am missing the right guard in the photo, as it was a last minute addition. I had it on hand and since we don't use body soap I just decided to recycle it here).


The soap bars needed to be chopped and grated.


To grate them I used my electric salad shooter. I did not want to spend half a day grating. I made sure to be gentle and not push the soap through too hard and it worked like a charm. 


I grated all 3 soaps into the same bowl...


...and then I mixed them well. I love the colors. The textures are different since Zote was more 'fatty' and moist and Naphta and Right guard were more 'dry' and brittle.


At this point I got a large bowl and added the ingredients as laid out by the recipe: bar soap, borax, baking soda, washing soda and Oxyclean.


I kept repeating this 5 ingredients step until I ran out of grated soap. So basically, I multiplied this recipe's amount by 6 times, since I grated 6 cups of soap. At this point all I had to do was mix it well.


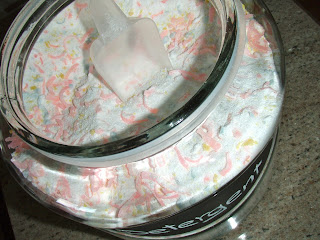
I scooped the detergent in my container, et voila'. Done! Honestly it took me longer to write on the container's tag than it did to make the laundry soap! ...and that's not a joke! LOL. 


This laundry detergent is super easy and fast to make (if you have an electric grater of sort) and it will end up costing between 4 and 5 cents per load. Even if one is not worried about all the harsh chemicals, found in traditional laundry soap, the savings alone should make this worth it! The soaps and chemicals used in this recipe are much milder than those in traditional detergent, so that's good both for the skin and for the planet. It's a win-win situation in my opinion. So, as long as I am happy with the results, I will be avoiding regular detergent as much as I can. 


If you use fabric softener for your rinse cycle, and would like to go the green-and-thrifty way, you can substitute it with white vinegar. No, it does not leave a smell residue on your clothes. I use it anytime I don't have any home-made fabric softener on hand. I will upload a recipe for my proven laundry softener too the next time I make a batch. Happy laundry!


Friday, July 26, 2013

Thomasville Buffet Tutorial


I have been on a hunt for a buffet for months. Regular people may have pantries, but our 1971 home does not. I was so glad when I finally found this piece to store all my miscellaneous kitchen implement. I think I may go totally wild here and even buy a crock-pot! What?!? I just may. LOL


I am happy I rescued this guy, $40 was all it took. He was sitting in what the seller called 'a barn', plopped right in the middle of a donkey pasture. Gophers holes scattered about. Such 'barn' was a building of sort, consisting of merely 2 adjacent walls, and a roof, made of corrugated sheet metal. One, of said walls, had a window-like-opening that took up a third of the surface. I guess it was needed for ventilation, given that only 2 walls were missing! ^__^ There was no pavement to the barn, just dirt and dust, with a patch of grass here and there, and the popular gopher hole. The seller had merely put down a piece of plywood and had perched the buffet right on top of it. I never fail to be amused by Craigslisters. It seems incredible to me how little value people have for their own belongings. Amazingly enough, the cabinet was in really good conditions. It was just really dirty and in dire need of a makeover! So we carefully loaded it on the back of the truck and off we drove home with our brand new project. 

As soon as I got back I got my vacuum out and cleaned it out as best as possible. I then steamed the entire thing, inside and out. My DH was worried that there could be critters' transmitted diseases lurking on the surface, which would be dangerous to our cats. So I took my time and cleaned it out real well. Given the exceptional weight of this cupboard, I decided to paint it in place. I merely put down a tarp (old vinyl table cloth - love recycling) and a pair of two-by-fours to hoist it in place. As you can see this time I abandoned my trusty Zinsser primer in favor of a can of Sherwin Williams Oil based primer that I got for free after a store error. It worked just as well, but I would not pay that much for primer.


The hardcore 1980's look may have deterred other buyers, but not me. I realized at first glance that it had just enough details to be interesting, but not too much to border on gaudy. I also found the hardware very interesting and I imagined it working well with my color scheme. Here is a front view of the doors.


I proceeded to remove the hardware and label it. I always label the hinges as well, for easy re-assembly! Since I knew that I only wanted to paint the exterior, I carefully taped all the areas I did not want to get smudged. The drawers have built in stoppers that prohibits them from being removed, so they had to be painted in place. I used a Purdy brush, for all the small areas and crevices, and a roller for the sides and top. The roller left a very uneven bumpy surface, so I had to sand the top and sides down with a fine grit sandpaper before painting it. After sanding, I wiped the whole cabinet down to remove any dust. 


Since the doors were so intricate, and full of nooks and crannies, I opted for a spray primer for those (my favorite - Zinsser). Here are the doors in my garage, primed twice and ready for paint.


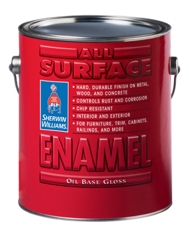
I used Sherwin Williams all-surface enamel oil based paint in a semi gloss finish.

Photo courtesy of Sherwin-Williams.com
I got it tinted to match Behr Baritone 680F-7 (the darkest purple in this swatch). It was a very close match, although you may have a hard time recognizing it here.

Photo courtesy of ariannekrekeler.wordpress.com
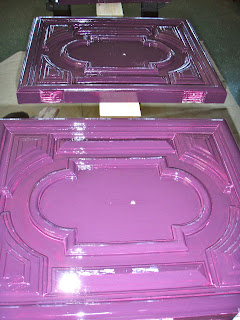
Dark colors are somewhat tricky. It takes many coats of paint to layer the color on. Here is the cabinet after only one coat of paint. Kind of scary I know, DH was afraid we'd end up with a pink cabinet ;-)


As you add layers of paint the color will saturate and intensify to match the actual color you picked from the swatch. The door to the left has two coats of paint, while the right has only one coat.


This is the cabinet with 3 coats of paint on...


...and these are the doors after coat number 4.


In total the buffet got 2 coats of primer and 5 coats of paint. It took a lot to build up from the white to the dark eggplant that I wanted. It could have saved some work by getting the primer tinted, but I had a gallon of primer, and I knew I would only use a quart or so on this project. So I just layered on the color. I waited a full 24 hrs between each coat, 48 hrs to carefully remove all the tape and also to re-assemble the buffet. So all in all it took a week for this project. Here is a view of the back side of the doors before removing the tape.


And here is my guy, I have nicknamed him Thomas (from Thomasville). I am very pleased with the results as well as with the color we chose.


The hue is different depending on lighting, so at times it seems more purple, at times it almost has hints of pink. As the days go by, and it keeps on curing, the paint is darkening as well.


Since I didn't paint the inside of the drawers, I lined them with some leftover wrapping paper I had.


I really love the way the coloring of the hardware goes with the dark eggplant shade.


So what do you think? Would you ever paint a piece of furniture purple? ^__^


Tuesday, July 23, 2013

Ikea-Hack Cat Tree Tutorial


I may have been silent for a while, but I have definitely not been idle. I have been forging full force into  my projects, but I have failed to report back to you about it. Since today I have a little time on my hands, a little updating is in order. 

A few months ago, I finally got to work on a new project for the kitties. It's really just for Rufus, as Smokey is more of a bush dweller than a tree dweller, but I'll use the plural anyways just to keep him feeling loved and included. LOL. It's a pretty simple project, I first saw it years ago on ikeahackers.net, and involves simply using an Ikea Stolmen rod (and clamping system) and fabricating some shelves to go along with it. Easy enough! So off to Ikea I went, and back I came with the Stolmen rod and hardware. The rod is priced at $30 and a pack of 4 brackets is $10. I then went to Lowes and purchased a sheet of 1/2 inch thick plywood for about $5. I proceeded to draw my shelf design on the plywood, as you can see with very professional tools (a glass, plates and a coffee filter) LOL...but it did the job and that's all that matters! 


Here you can see my design a bit better. I made 2 smaller shelves, as steps, and a larger one for the top as a platform...i used the actual Stolmen bracket to mark where that hole would go.


These are the manuals for the post and brackets. It should give you a better idea of what they look like and how they work.


At this point my DH used his ban saw to cut the shelves for me and then I proceeded to sand them carefully and round all edges nicely. This is what they looked like when done. Pretty cute um? They look like Ping Pong rackets. ^__^


The next step was to prime them and paint them. Here they are sitting pretty after two coats of primer.


I used the leftover paint from my kitchen cabinets makeover (one day I'll have to post all about that too) it is Sherwin Williams Pro classic oil based paint in semi gloss. The color is called White Duck, very appropriate since they are all lined up like little ducks ;)


In order to offer stability and traction I used a piece of carpet remnant. I measured it and cut it to size.


I then used my hot glue gun to secure each carpet disc to each shelf.


All done and ready for the next step.


This is when DH came in to help. He drilled holes for the Stolmen brackets' hardware...


...then following the Stolmen post instructions he begun to instal the rod. Note that the shelves are already threaded through the post in this step.


Now all that's left is to just install the shelves using the Stolmen brackets (instructions included in the hardware box). And....ta-dah! 


This is what a very happy Kitty looks like. 


She loves her tree and sitting on it to look outside the sliding door, or to take a nap. I am already regretting not making a 4th shelf. She would be able to get higher and would probably enjoy a wider perch at the top. So I have already purchased a thicker piece of plywood and will soon make her a larger top shelf.
I hope this post inspired you to make your own cat condo. Cats absolutely NEED vertical space! By nature, they not only enjoy -- but also find safety in observing the world from a higher ground. It takes so little to make them happy. We get so much love and affection from these beings, the least we can do is make their lives not only comfortable, but also enriched and pleasurable!