Tuesday, January 5, 2016

Homemade Lip Balm Tutorial

Yes, I am a chapstick addict! But to be honest it's hard not to be...living in such dry climate! I have been eyeballing different recipes online for a while now, to make my own, and I finally decided to just try a batch to give out as small Christmas gifts to my peeps.


Most of the recipes I found online were not exactly what I liked, so I just mixed up my own. I knew that I did not want just wax and coconut oil, like most Pinterest posts I read. I also wanted it to be fragrant and to add some Vitamin E for extra-soothing-comfort. I decided on mint because it's winter but also because I felt like mint would marry well with the cocoa scent as well (sort of like an after eight combo). Originally, I was going to add some Castor oil (visible in my mise-en-place image) as it does provide extra shine...but then I decided against it. I was not sure if the castor oil I have is edible. So, since this concoction will go on the lips (and will most likely be ingested, albeit in small quantities), I decided to leave it out. Better safe than sorry; and what's the point in making your own stuff if it ends up being unhealthy anyways? ;-)

This recipe yielded 11 containers. So I made 2 batches to fill all 24 containers.


Ingredients:

1.5 oz organic coconut oil
1.5 oz organic beeswax
1.5 oz organic cocoa butter
15 drops Vitam E (supplement)
10-15 drops Mint oil or extract (must be edible)


I decided to get out my scale and weigh all dry ingredients, to make sure I got a true 1:1:1 ratio. I put my measuring cup on the scale and then zeroed it out. I then added all my dry ingredients to equal 1.5 oz each (I added one more oz of cocoa after taking the photo). I decided on this amount as it would be easy to do the math. LOL. As I added my dry ingredients I looked for 1.5 oz - 3 oz - 4.5 oz. I do HATE MATH! O__o


Cocoa butter, coconut oil and beeswax all into my measuring cup, ready to be melted in a double boiler. 


Since I don't have a true double boiler I just put the ring from a mason jar inside my pot of water...


...and I sat my measuring cup on it. I turned the stove on on LOW and waited for the solids to melt.


Waiting for them to melt was about as fun as watching grass grow. -__- It ended up taking over 30 minutes to melt on low, but it was well worth the wait, as it all melted smoothly...no clumps left! 


...pure melted oil left (I used both a wooden skewer and a butter knife to mix/handle the balm).


At this point I added the Liquid Vitamin E...


...and the mint. It smelled so yummy! ^__^


I then slowly poured into my containers. As the liquid cooled it solidified VERY quickly, so I scraped the hard balm back to the bottom of the measuring cup and put it back on the stove to re-melt. 

Photo courtesy of Amazon.com
I forgot to take a photo of my containers before filling them. I got them at Hobby Lobby for $9.99 for 24. They looked like these and are beads containers. I washed them VERY well with dish soap and  water...and I dry them for a several days prior to making the chapstick.


This was my first batch. I only got 11 containers filled. I filled them on a tray for easy clean-up in case of spills...and what do you know? I spilled! LOL. The melamine tray made it easy to scrape the spilled balm, when solid, and put it back into my double boiler for re-melting. Cleaning the measuring cup and butter knife was also really easy. As soon as I filled the lip balm tins, I immediately wiped the cup and knife with a paper towel. Because they were still hot, the waxy mess came off quickly and then I washed them as usual. Not much of a mess. 


I put the containers in my COLD oven overnight - to cool completely. The lids went on only the next day. I was afraid that condensation would form otherwise, and since there is not preservatives in this balm, I wanted to make sure everything was nice and dry before sealing.


I then got my labels out (got also these at Hobby Lobby - had to use envelope seals as they were the only round labels small enough to fit these tiny boxes)...


...and used a sharpie fine point to write the content on them.


I waited about 2 hours before adhering the labels to the boxes but, given the very waxy finish of the labels, it was still not long enough for the ink to dry. GRRRRRRRR. I guess I'll keep the ugly ones for myself.


Here is the final batch of lip balms. I hope that my peeps will enjoy them. Hopefully they will let me know how they like the consistency and will give me pointers if any improvements needs to be made to this recipe. 


Saturday, January 2, 2016

Gumdrops Tutorial

In the spirit of more handmade Christmas gifts, I decided to make some gumdrops. Candies are very pretty to look at, some are easy to make,  and it seems like everyone (besides me) enjoys eating candy.
Since I will be gifting them, I made a large batch that yielded 16 cups of gummies, but the recipe could be shrunk down if making just a few.

Strong peppermint drops
INGREDIENTS:

For sugar syrup:
8 cups sugar
2 cups water

For gelatin: 
3 packages (12 envelopes) plain gelatin
2 cups cold water

For finishing:
1/4 tsp each FOOD GRADE oils or essences (I used lemon, orange, vanilla and peppermint)
10 drops food coloring
(amounts based on quartering recipe to make 4 flavors/colors gumdrops)
2-3 cups Sugar (for coating)


I made the gumdrops in 2 separate batches, as I did not have enough molds to make the whole batch at once. The process was the same for both batches. I started by making a simple syrup with 4 cups of sugar to 1 cup of water. 


I brought to a boil on high and simmered on medium...


...as the sugar water boiled down it became more translucent. 


This is how it looked after 5-6 minutes of rendering. (on my second batch I cooked it longer, more like 10 minutes to get a thicker syrup. I feel like that was more successful in hardening the candy a bit more). 


While the syrup was cooking, I put 1 cup of cold water in a bow and evenly sprinkled it with 6 envelops of gelatin 


The powdered gelatin set quickly in the water...


...I stirred it to make sure that all the powder got evenly wet and mixed.


I then added the HOT simple syrup to the gelatin. I mixed well for several minutes trying to get rid of all the unsolved clumps of gelatin. I removed, with a small sieve, the few remaining unmelted clumps of gelatin...


...until all that remained was a clear liquid (with my 2nd batch I got a thicker liquid, which yielded a better and firmer candy).


I divided the liquid equally in two containers and added 1/4 tsp flavoring, 10 drops coloring each and mixed very well to incorporate.


I then poured the liquid into my 2 silicon molds and let set in the fridge overnight.


The next day I carefully peeled the gelatin from the mold


I placed it on the counter on a parchment paper sheet.


I then proceeded to cut it first into strips and then into small cubes (I often dipped the knife in warm water to help with the EXTREMELY STICKINESS).


I rolled the little cubes in white sugar to coat and to prevent them from sticking to each other


I carefully placed them on trays lined with more parchment paper. 


I then had to dry them to make them firmer and easier to handle/store. I covered them with a clean dish towel and put them inside the cold oven (to keep them safe from the furbabies). The first batch took FOREVER to dry. I am talking like more than a week, because I did not cook the simple syrup long enough -___-


The second batch, made with a thicker syrup, turned out much better. I only dried them for 2 days and they are prettier too. 


You can clearly see the difference here. The blue candy is so much crisper and prettier than the yellow candy. I am not going to lie, it drives my OCD nuts to see that the sugar is 'messy' around the yellow and orange candy, but it will have to go down as my messy 1st attempt o__O


I mixed the lemon, orange and vanilla flavored gummies in a large bowl, but I saved the mint gumdrops to package them alone. I did not realize that mint would be SO strong to even contaminate the other candies nearby, but that's what would have happened if I had packaged them together. The vanilla candy got a slight minty scent just by sitting in the same cold oven to dry for 2 days. Nuts!


I got some treat bags and some labels at Hobby Lobby (it is very important to use food grade containers and off course also flavoring, if using oils they MUST be food grade).


I placed about 1 cup of gummy gum drops per bag, I adhered the labels (before filling the bags) and I tied a cute ribbon around it. 

And that's it. Candies are ready to be gifted!
Happy 2016 peeps.


Saturday, December 26, 2015

Felt Ornaments Tutorial

'Tis the season for gift-giving and I am STILL trying VERY hard to gift as much handmade and up-cycled loving gifts as possible. It has been hard with my past semester's workload, but I had my mind set to do something for each one of my friends. So, I scoured the web to look for things that I could make as soon as I got on Christmas break.

I have always loved felt ornaments, and I knew they would be something I could accomplish easily, so I set out to buy some supplies from Hobby Lobby.


I got everything for 50% off, and also got some supplies that I did not use for this project (bells & sequins) but sometimes when I start a project my mind goes in one direction...when I truly end up taking a completely different path. This project was a bit side tracked, just like that. LOL. 


This is stuff that I truly used: some home-made cardboard shapes, felt, embroidery thread...


...and the ribbon spool from this image. ^__^  You may yet get to see the rest of the supplies, used later on for other projects. Who knows? With me it's always a surprise. HA!


This is how I made my heart pattern. I used an old cracker cardboard box and took advantage of the pleat. I drew my half hart on one side and cut it out, when I got the shape I liked. Drum roll...


...Tah-Daaaaahhhh symmetrical heart (with messy doodling all over it) created.


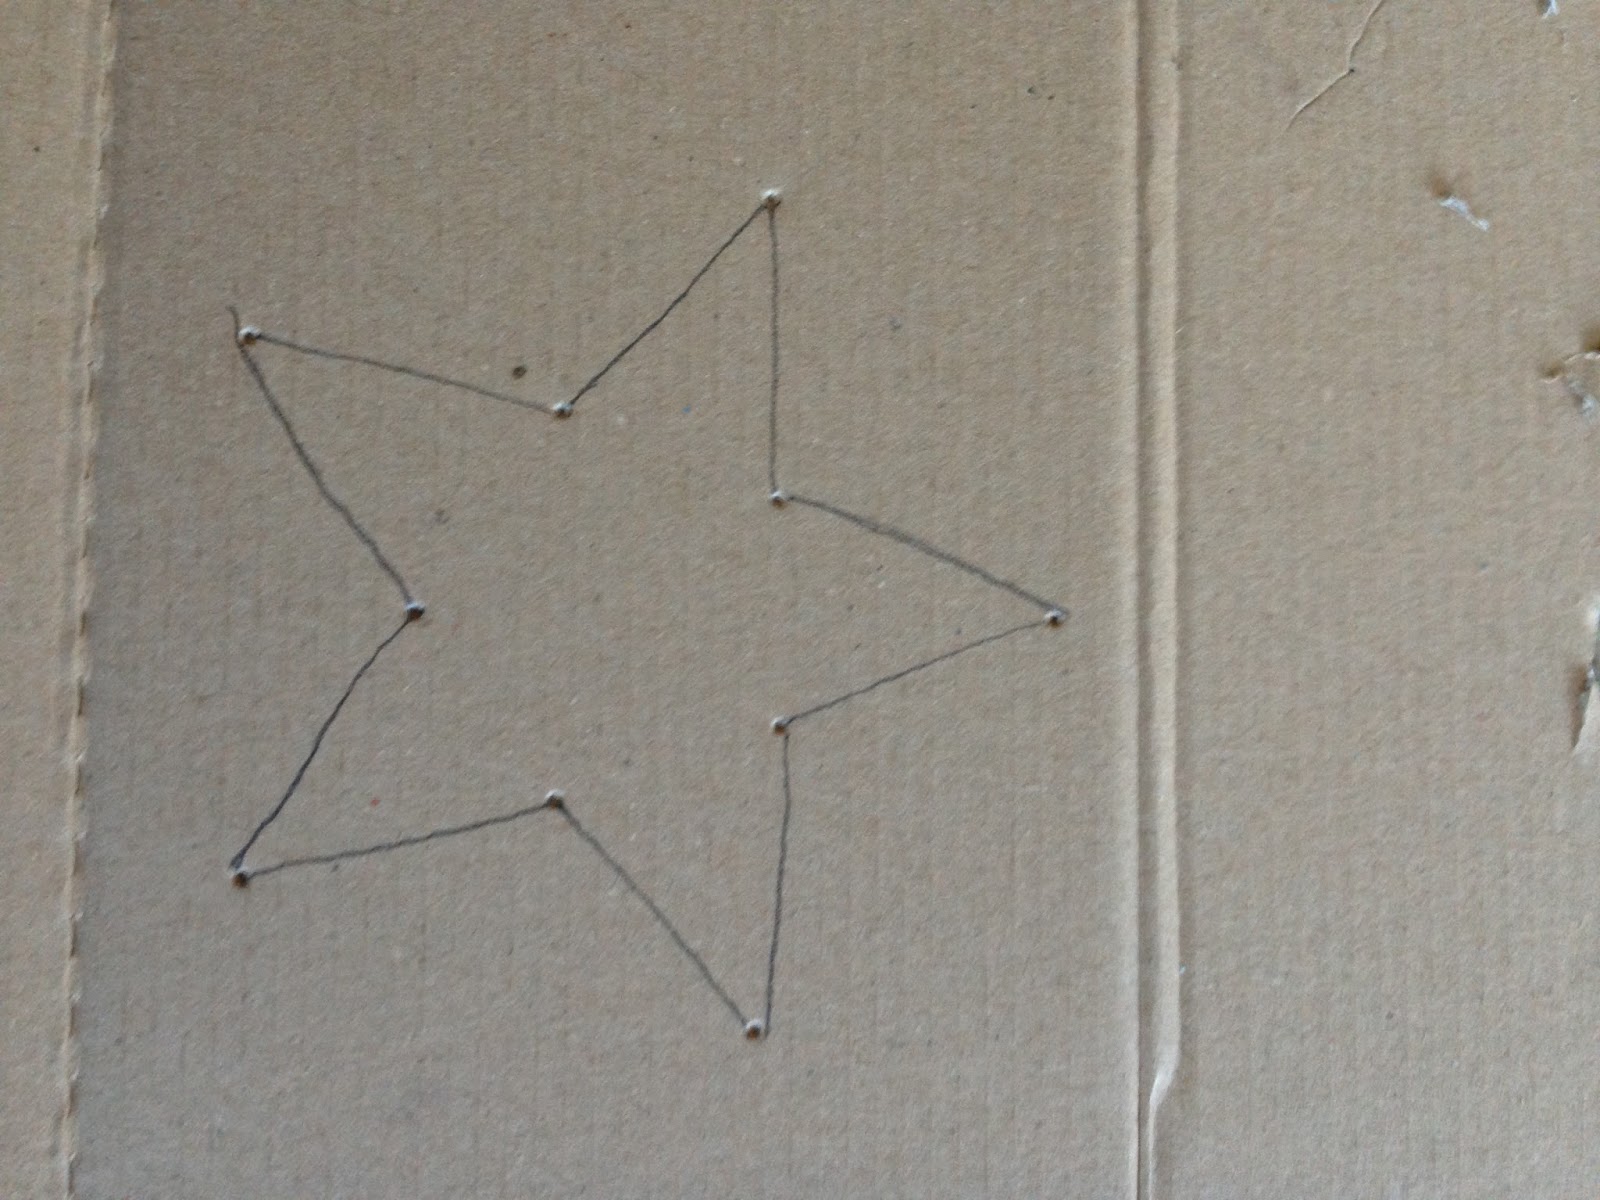
I repeated the process for the star poking holes at the correct distances then connecting the dots.


I then used the pattern to trace the shapes on the WRONG SIDE of the felt...


...and I cut them out. 


At this point I just free handed some very SIMPLE embroidery on half of my cutouts. YES, OFF COURSE THAT IS A CAT UNDER THE ORNAMENT. ^__^ How could it not be? The fur babies are always trying to help me with my projects and they make sure they put their stamp (a.k.a. hair) on all of my projects. But that's how we roll here...


I cut a piece of ribbon to the desired length and secured it in place with a few stitches. I wanted to make sure it would stay folded the way I liked it, with the print facing the ornament.


I then got a second felt heart, I matched wrong side with wrong side (right sides out) and I hand stitched the perimeters shut. I placed my ribbon sandwiched between the 2 layers of felt and stitched it in place making sure I got as many stitches possible through the ribbon.


I continued stitching all around the perimeter, leaving a small opening for stuffing.


...I used a mixture of simple stitching and blanket stitching for my perimeter (both are easy patterns to learn and tons of videos are available on youtube)...and YES, this is a different cat. LOL. They did take turns hogging my lap while I was sewing. They do get mesmerized by the thread and then fall into an hypnotic coma. O__o


I then stuffed the ornaments (and pushed the stuffing to the corners with fingers and a wooden skewer) and closed up the perimeter. That's about it. 


This is how they look in a grouping. 
I think they came out pretty good.
I gave one each to my Christmas guests as a small homemade token, hopefully they liked them.

Happy Holidays :)